
These instructions will help you make you your own huaraches from scratch using our 4mm Connect or 6mm Contact Xero Shoe Kits. If you purchased a Vibram Classic Kit, or want to learn to make running sandals using any other material, check out our How To Make Huaraches page.
And, at the end of the instructions you’ll learn how to tie huaraches.
You can also download a PDF of these instructions by clicking here.
What you’ll need to make your Xero shoes:
- Hammer — to use with our included hole punch, to make the toe hole for your shoes
- Magazine or newspaper — to put under your outsoles when you use the hammer and punch (so you don’t punch through your floor or table)
- Lighter or match — to seal the ends of the lace
- OPTIONAL — Ballpoint pen — to trace your foot if you want to trim your Xero Shoes
- OPTIONAL — Sturdy scissors if you decide to trim your outsoles.
Step-by-step instructions for making FeelTrue® Xero Shoes:
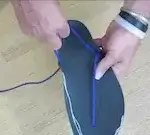
Step 1 – Decide whether you want to trim your outsoles
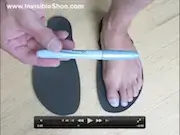
Step on the Xero Shoe outsole with the back of your heel in line with, or slightly in front of, the back of the outsole.
How well does it fit your foot?
If your foot “fills” the outsole, you’ll probably want to leave it as-is.
If there’s a LITTLE bit of extra space around your foot, you may want to leave that, too… you can try out your Xero Shoes without trimming them and then, later, if you want to, trim them.
If your foot is especially narrow or curved, or there’s a lot of room in front of your toes, decide whether you want to retain the inside edge, the outside edge, or trim both edges.
If you want to trim your Xero Shoes, continue with Step 2.
If you’re NOT trimming your Xero Shoes, go to Step 5.
Step 2 – Trace around your foot
Holding a ballpoint pen (or Sharpie marker) vertically, trace around the outside of your foot.
You don’t need to get every tiny nook and cranny, and you’re not trying to get an EXACT measurement of the sole of your foot… in fact, by holding the pen vertically, you’re making a trace that’s slightly bigger than your foot, like getting the shadow of your foot… and that’s exactly what you want.
Step 3 – Even out the tracing
You want to smooth out the curves. For example, you want to make the toe area into a curve, rather than bumps for each toe.
Also, I extend the area on the inside of the big toe and the ball of the foot a little bit (sometimes when you run, your foot slips to the inside, so you want to add a bit of extra space here)
Step 4 – Cut out the soles
You can use a good pair of kitchen scissors for this. Or if you have them, use tin snips, or a pair of “EMT Shears” (also called “EMS Shears”).
Cut around the tracing. That is, cut on the outside of the line you’ve drawn, rather than ON the line. Again, that little extra bit can help. Plus, you can always cut your huaraches and make them smaller, but you can’t make them bigger, so err on the side of too big.
If you have our 6mm Contact sole, you may have to put some “elbow grease” into it — they’re a bit harder to cut through.
Also, if you are right handed, it’s easier to cut in a counter-clockwise direction.
Then, when you’re done, if there are some jagged corners you want to clean up, do that by cutting in a clockwise direction, or try using some sandpaper.
Step 5 – Mark the toe hole
Step on your soles and, using a marker (I use the Sharpie from Step 2), put a dot between your 1st and 2nd toe, about 1/8″ in front of the webbing between your toes.
If there’s a gap between your 1st two toes, put the mark slightly closer to the 2nd toe than right in the middle of the space between the toes.
The reason for this is, as you run, your foot will want to shift toward the inside. By putting the hole closer to the 2nd toe, your foot stays in place better.
NOTE: It’s sometimes easier to have someone else do this.
Step 6 – Punch the toe hole
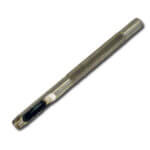
SPECIAL: We now include a hollow punch, like the one pictured to the right, with every Xero Shoe kit, absolutely free of charge. (if you want to buy an additional punch, click here)
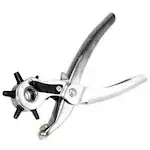
Punch out the toe hole using the included hollow punch or, if you happen to have one handy, you can use a rotary hole punch (if you don’t have one of these, you can find them at any craft store, or on eBay, or you can usually borrow one at a leather or shoe repair shop).
To use the hollow punch: Place a magazine, or folded newspaper, or piece of scrap wood on the floor or table (some hard surface). This is to protect the surface when you use the hollow punch.
Place the outsole on top of that.
Position the hollow punch on the toe hole mark you made in the previous step. Hold it perpendicular to the ground/sole (not at an angle).
Give it a good whack with a hammer.

How to use the Hollow Punch
Using the Hollow Punch
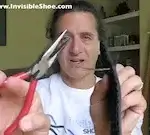
Step 7 – Prepare your lace ends
Check out the video to the right… if you use the “bobby pin method”, there’s nothing to prepare.
If you use the first two methods, be careful with the heated ends… the material stays HOT when you heat it (no surprise there, I hope 😉 )
Step 8 – Thread the lace through the toe hole and secure it
Push one end of the lace through the toe hole, from the top to the bottom.
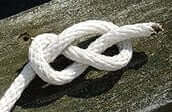
Make a knot in the lace, on the bottom side.
Traditionally, I used a “Figure 8 knot”, click the picture to the right.
After you’ve made the knot, run the flame from a lighter (or match) under the knot, to melt the nylon slightly, then press the knot together to seal it and flatten it a a bit.
If you want, squeeze the knot flatter with a pliers.
Lately, though, I’ve been using a lower profile “Lace bead.”
Step 9 – Thread the ankle holes
Pass the lace through the outside ankle hole first, from top to bottom.
Then pass the lace through the inside ankle hole, also from top to bottom.
Follow the pictures to get it correct… you want the lace to “lock in” around the holes.
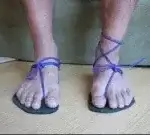
Step 10 – Select one of the fun tying styles
There’s been more creativity in the “how to tie huaraches” arena since we started selling Xero Shoes than there has been in the 10,000 years since someone first came up with sandals like these.
And there’s no way to have written instructions for them all (well, there is, but it would be miserable to go through them.
Instead, check out the different cool, decorative, and stylish ideas — with video instructions — about how to tie huaraches and what to do with “leftover lace”
Step 11 – Most importantly… Go out and ENJOY your new Xero Shoes and Live Life Feet First!
Remember, though, to take it easy at first. If you’re not used to going barefoot, especially running barefoot, you’ll be putting more stress on your muscles and skin than you’re used to. Work your way into your huaraches slowly.
And if you come up with cool, new tying ideas, let us know so we can put them on our Tying Page


What can You Expect from Minimalist Running Shoes?…
Thank you for submitting this cool story – Trackback from Lollu…
I just got my 6mm shoes and laced them up! Heading out for the walk! I was concerned at 1st from the video, seeing this big knot on the bottom of the shoe – but surprisingly, I don’t feel it much when I walk! I am sure after a few miles it will wear down and flatten out more. So far, I love how light they are! Looking forward to putting some major miles on these babies!!
Give us a call at 800.499.8880 and we’ll work something out.
What’ the secret to not making a “plap” sound when i run? I ran my first mile of 5000 miles the first day! Other than the sound, it was a pleasent run.
Check out this post, Scott — https://xeroshoeslabs.com/correcting-barefoot-running-issues-part-2-slapping-sounds/
Wasn’t happy with where I put my toe holes, and repunched them. Any ideas on whether I should fill the old ones? And what I should fill em with?
I wouldn’t bother. But if you’re going to try, some Shoe Goo might do it (www.xeroshoes.com/shop/)
Hi You asked what the knot was that you tied it is a cow hitch.
love the shoes and i’ve only put one on sofar
cheers Eoin
Just made sandals for myself and three tiny kids. We took the core out of the cord where we tied the toe knot, and it made a big difference in comfort. Thanks for the great product and thorough instructions. I’m excited for my kids to have summer shoes I can feel good about, especially ones that don’t cost a fortune.
All tied up and ready to try them out. One suggestion – as thorough as the video is, it would be easier to follow if it was shot as if you are looking down on your own shoe, as we are. Your feet are backwards! Lol. Thanks!
Actually, Patricia, for a few of the videos there is a “1st person” video.
Just did my shoes yesterday. Overall went well, but I will note that either the punch tool I received is too dull, or I’m weaker than I realized. It definitely took far more than “a good whack with a hammer” to use it. More like five minutes of whacking per shoe, then eventually turning each shoe over, pushing the tool through as far as I could manage, and whacking it from the other side. It worked, and I loved my first experience with the shoes regardless, but that part of the instructions could use some improvement.
FWIW, you’re the first person to report this. Even if the punch was really dull, a good whack *should* do the trick. The good news, of course, is that you got it done and are enjoying having the super-power of having made your own shoes 😉
Steven, I just got my custom sandals and decided to punch a couple of new holes to try a different tying style. I experienced the same problem referenced by the others. I used a 2 x 4 to place the sandal on for punching the hole. Repetitively whacking the punch simply put a dimple in the 2 x 4 and did not cut the sole. When I place the sandal on a steel plate, a whack cut it immediately. So using a relatively soft surface to place the sandal on may have caused the problem the others mentioned.
That’s why I say (I think) to put the sole on a hard surface (with a magazine or newspaper under it). Though, fwiw, I’ve used a 2×4 as the base quite often without a problem. Hmmm…
The reason I mentioned it is that I believe most people – myself included – would consider a 2 x 4 to be a hard surface. So perhaps a clarification on what constitutes a hard surface might reduce or eliminate the problem in the future.
BTW, I was delighted to see you guys on the Shark Tank and doubly delighted that you did not do the deal! As an investor in developing companies, I always salute those who figure out how to be successful with little or no outside capital.
Also, I forgot to mention that I love the sandals – especially after changing to a tying pattern that did not use the cord between the toes.
Well, again, I’ve used a 2×4 without a hitch… maybe we have better wood in Colorado? 😉
Thanks for your Shark-related comments… it wasn’t hard to walk away from that “deal” though, ironically, things have been growing so fast since the show that we’re in conversations with other investors.
Glad you’re enjoying your Xeros!
I’d be interested to see your sandals without the toe strap, I had thought about that but didn’t want to ruin the main sandal part if it didn’t work..
Look at http://www.xeroshoes.com/tying. FWIW, if you punch a toe hole and don’t use it, it’ll still be totally fine.
If you decide to use a no-toe strap lacing method, the rest of the instructions about trimming, etc. are the same.
I use punches a lot and there is only one tiny spot on the kitchen counter top where it works. The rest of it is too “springy” and things just sort of bounce around. Even the table springs, unless I’m directly over the leg. I have a dead solid punch block in the basement but recently suffered a broken foot and couldn’t do the steep, narrow stairs very well, but I now have the benefit of knowing every upstairs surface on which I can punch and every surface on which I canNOT, LOL!
Now you know why we recommend the floor (without carpeting, and with a magazine under the sole so you don’t punch through the floor) 😉
Carpet, carpet everywhere – except in the basement. Besides, I was on a mission, hunting for dead spots.
Jarrett, You’re NOT the first person to report this. I wrote about my own troubles with the hole punch on Xero Shoes Facebook wall several weeks ago. I think Xero Shoe’s instructions to just simply give that punch a good whack with a hammer is just not working for a lot more people than they’d like to admit. I finally just had to have a friend with a drill, drill a toe hole for me.
Stephanie (and Jarrett), we’re not hiding any secrets about the punch. Candidly, your are the first two (and only) comments we received about this. We, and thousands of our customers, have punched tens of thousands of holes in our outsoles with the punch by following the instructions we gave (using a hollow punch is not something we invented; it’s a thousand+ year old tool).
It’s too late now, but if you made a video of what you were doing I might have been able to diagnose the problem.
Again, sorry to hear you had trouble. I assure you, if we heard about a problem even once a month we would have found a new solution by now.
I gave mine a good whack and it went through the shoe and a whole catalog! 😀 I was very impressed.
I gave mine a good whack with a mallet. Did the job perfectly (managed to clout my thumb too)
I *thought* we made the punch long enough to keep thumbs out of the way.
Just punched through my shoes and it took 3 little hits with the hammer. Might not be the same for everyone, but I had no problems what so ever. Now to the lacing. Then for the fun part – the run : )
You should have whacked it over a solid, hard surface…other wise y takes more than one whacking…either that, or you whack your fingers.
Just punched my holes w/ no problem. Do some push ups or something people!:)
I got my shoes yesterday and did the cuts and holes. I’m finding my feet are going a little too far forward on the pads … I tried putting in the ankle holes a little further back, but it didn’t seem to help – any hints?
Just got my shoes yesterday. I love them. I followed the videos on making them and had no problems. I am a reflexologist so when I started looking into xero shoes it made so much sense. I am looking forward to walking and running in them.
I want to move my toe hole about a 1/4 inch ( center to center) up because my feet seem to slide off the back. Do you think the sole will rip between the 2 holes? On another note, I am flat footed and my Xero’s are a challenge for me but I love it!
Before you move the hole, try tightening the heel strap.
But if you have the holes 1/4″ apart, that should be fine.
And regarding flat feet… mine USED to be flat. When you start USING your feet, like working on any muscle, you can feel it as you get stronger.
I found that by placing the thick wine magazine from the liquor store, on the rug on the wood flooring, I could not get it to punch thru but then when I put the magazine on the wood floor all it took was once whack of the hammer. So…use wood with a magazine and you will have no problema….now ….on to the lacing bit. Cheers
Yup… the key is: hard surface, magazine, sole, PUNCH
Got my Xero’s and assembled them today. Re-tied them twice to make them tight and “one with my feet.” When I went outside for a walk (~1/4 mile) I noticed that my feet slide back in the shoes, so far back that my big toes are “stepping” on the laces (uncomfortable but not painful). I checked the laces, very snug/tight on top of my feet and around the heels but I can easily push the shoes forwards and backwards. What do you suggest to fix this?
a) Which tying style did you use, Patrick?
b) It sounds to me like you just didn’t make the heel strap tight enough
c) Photos might help
a) I use the Basic style.
b) After tying and walking with them a few more times I discovered that I need to have my feet all the way up to the thong lace (snug) and then pull the heel straps really tight. My toes are then really close to the top edge of the sandals but as I walk my feet slide down just a tad and stay there.
Now I have to tie them a few more times to find the “sweet” angle for the thong lace. Even thinking about trying Raymond’s Double-Thong to see if it works better.
I also found out that I don’t need to take the sandals off when finishing the lace, just loosen the front knot a bit and use the bobbin pin to pull the lace through.
I quite easily (and I’m no body builder, I can barely do a plank… working on it) punched through mine with the punch included. One whack with a cast iron pot lid. Went right through and left a nice circle in my cutting board too 🙂 Maybe there were a defective few?
I just got my shoes and trie to trim them. I am now left with a very jagged edge that is unattractive. Does anyone have any suggestions on how to fix this? Please!
3 things:
1) When you trim, use the back edge of the scissors (you have more control with it) and turn the sole gently AS you cut.
2) To clean up “points”, flip the sole over and trim the points. For some reason, it’s easier to get those when you cut in the opposite direction that you started with.
3) Sandpaper. We finish our custom-made Xero Shoes on a belt sander, but using a heavy grit sandpaper will do the same job.
Thank you for the suggestions. The sandpaper helped a lot. Not perfect but much better. Next time I think I send a foot trace in and get you to do it. Much cleaner lines I think.
I love the idea of the Xero shoes. However, not a runner (yet). Would they be a good option for just everyday wear?
Absolutely, Kay.
Xero Shoes are all I’ve worn for almost 4 years, in every situation (except when I had to be in court and at a formal family event 😉 ).
Lena isn’t a runner either and she lives in her (decorated) Xeros.
My hole punch was easy breezy and I am an old lady. Whatever improvement you did worked. I followed the video but my tying doesn’t look as good as yours. Excited to wear my Xero shoes on my next walk
Thank you
The hole punching depends on the type of hammer you’re using (bigger/denser works better) and the surface you’re doing it on. I started inside on a book ontop of my vinal floor with a 12 oz hammer, but when I went outside on my cement walkway, it was far easier to make the hole with my bigger (22oz)hammer for both reasons: the surface being hammered onto underneith and the type of hammer.
True… and, fwiw, the video that I have here is with a 12 ounce hammer on a flimsy table.
just wanted to share, a whack was all it took on both my 4 mm and 6 mm.
I just bought the DIY sandals and got as far as the how-to-tie video and I’m really stumped. I’m no knot-tying girl scout and the mirror image is just messing with my mental compass. Steven, I may be the one and only person who can’t decipher this backwards, but a re-do of the video with the camera attached to your head looking down at your foot would be a godsend for cognitively deficient people like myself. Oh, and after you demonstrate tying a sandal on your right foot, do your left!
Which tying style are you trying? There is EXACTLY what you’re asking for at https://xeroshoeslabs.com/barefoot-sandal-tying/xero-basic/ (first person, and left/right).
WOW!! Your response arrived with stunning speed! I’m attempting the “favorite” tying style at the moment — literally! I’ll head to your suggested website. Thanks so much!
Just got mine in the mail and put them together. Nice quality punch! Better than one I bought at a leather shop. Video instructions are great. Hairpin is very clever and useful too. Going for a run in a couple of hours, looking forward to trying these!
Hi,
After reading the instructions about how to make the hole, I started thinking that punching the hole ‘vertically’ is less than optimal. It seems to me that the strap is more at a 45 degree angle as it leaves the sole. Would you consider a 45 degree hole punched through the sole to be an improvement?
Spence
I’m not sure if it would make a difference or not, frankly. Give it a whirl and see how it works for you!
Hi Stephen,
We are the people who ordered from India. We got the shoes finally on Friday 15th Nov. It took a very long time due to my error of putting the wrong name on the Singpost address…… Anyway!!! We have just finished making our shoes today. I cut my 2 year olds soles to size and he likes them very much. My 6 year olds also had to be slightly cut. I’m still working out whether to cut mine or not… I think next time we’ll go with the new ones that are ready made because they look amazing. We’ll send photos soon and let you know our wearing experience… 🙂
Glad they made it! Looking forward to the pics.
Thanks for the easy instructions! Took about an hour and a half! There’s extra sole in the front, that I will cut later, once I am sure how much is needed to be taken off..Also did a trial run of 3k..this thing is the closest to barefoot (after barefoot itself)! All the natural foot flexibility stays intact. I stay in India and I wonder how long the laces will last and what I can use to replace it!
Hi Praveen,
I bet if you make a second pair, it’ll take you about 10 minutes 😉
I’ve never worn out a pair of laces. If you have good form, you shouldn’t put stress on the toe knot, and certainly not the ankle holes (since putting force on that part of your foot means you’re probably heel-striking *and* pulling/pushing with your feet instead of placing/lifting).
You can reinforce the laces, if necessary, with some flexible epoxy (we sell Shoe Goo, but we can’t ship it overseas).
And if you leave the laces long, rather than trimming to the smallest length, you’ll always have some extra. We also sell extra laces on our website: https://xeroshoeslabs.com/shop/extras/extra-laces/
Just made mine and my little ones shoes. Not bad! The process was twice as fast the second time around. I’m worried I *may* have cut one of mine too much but I won’t know for sure until I get out and go for a stroll!!
When I made my first pair, it took about 20 minutes. Now I can do it in 5 😉
Just decided to cut my shoes, and now i have jagged edges, and trimming this way and that way has no gotten rid of them, the strongest sand paper is not going to do the trick, any tips? Also im ocd about them not being exactly the same, some one reassure me this is okay! grrrr otherwise great and im getting used to them!
Actually, strong sandpaper is EXACTLY what we use to smooth out the edges (though, since we’ve made so many, when we cut them, they’re pretty smooth already).
A belt sander makes the job effortless ;-).
Our other “secret”, which it sounds like you may have tried, is trimming off the “points” by turning the sole over… so if you cut in a counterclockwise direction with the sole up, then turn it over and trim the points also in a counter-clockwise direction.
I just did my hole punching; I found two firm taps (on the “hard” surface of an Ikea desk), followed by a twist of the hole punch, maybe two, and I was good to go! Maybe the “tap-tap-twist” will be helpful to others here.
Can’t wait to get them on!
Just got my XeroShoes! Cool bonus- the hollow punch will come in handy on my belt from all the weight lost from running/walking more!
I just got these in the mail as a gift. I was so confused at first but quickly learned to love them! The hole punch scared me at first because I was afraid I would do it wrong. I was wrong in my fears and it turned out great. As long as you hit it on a hard surface with an item to prevent damage in between it’s flawless. My only complaint is the figure eight knot I put on the bottom of the toe knot is causing my issues (with my knee and ankle issues I walk heavily on the front of my feet). I made sure it was facing forward but it still causes discomfort, I’m going to be playing around with it and see if I can make it to where it wont be felt.
Instead of the Figure-8 knot, you may want to try the “Lace Bead” — 2nd video from the top at https://xeroshoeslabs.com/barefoot-sandal-tying/xero-basic/